Uncategorized

Can't Beat Sa Collabra

How to be Mallorca Perfect for a Spring Cycling Camp
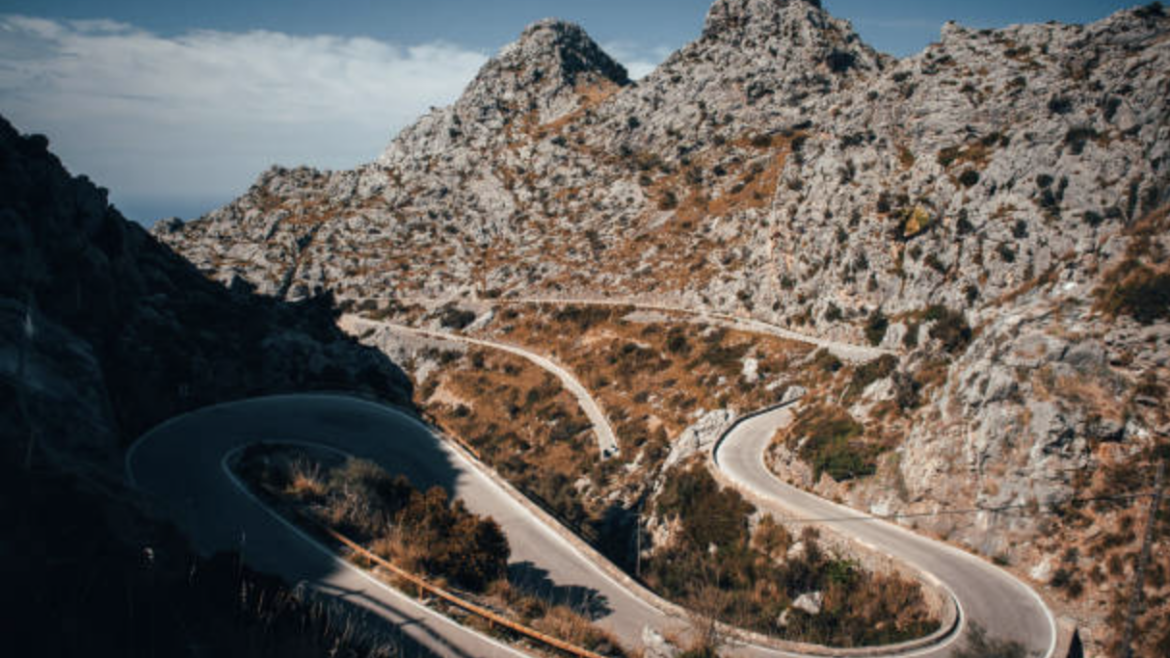
1024 678 Patrick

Embark on an adventure of a lifetime with our Mallorca Cycling Camp! Join us as we explore Europe’s cycling Mecca, the beautiful island of Mallorca. Over the course a week, we’ll spend 5 days riding along stunning coastal roads, through picturesque backcountry lanes, and tackle some of the most challenging climbs on the island. And don’t worry about a thing – our leaders will take care of all the details, so you can focus on the adventure.

Your itinerary begins with a flight to Palma, where we’ll pick you up and transfer you to Port Pollenca and your home for the week. You can pick up your bicycles and take a short test ride. You’ll spend the night in a comfortable hotel complete with delicious food.

On Sunday we do a test ride of about two hours. There is the option to extend the day’s ride for those who are feeling particularly adventurous.

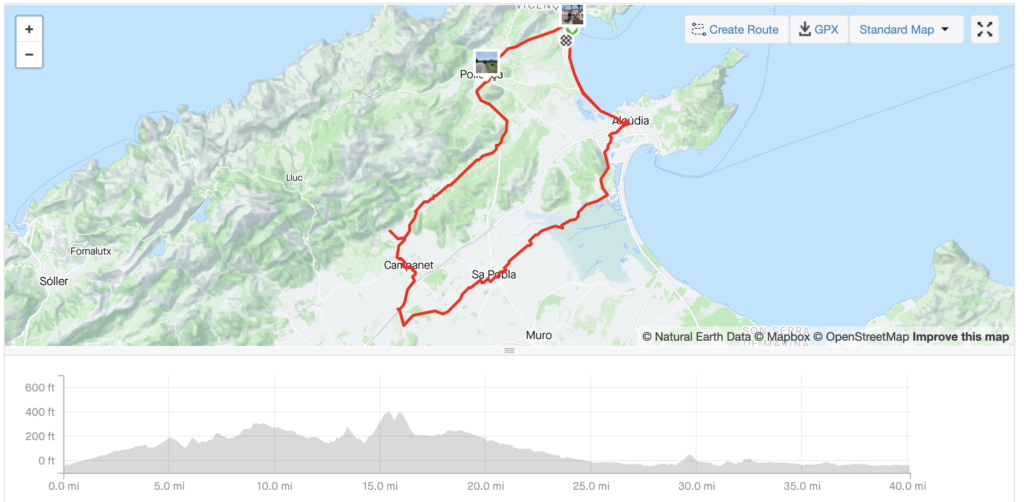
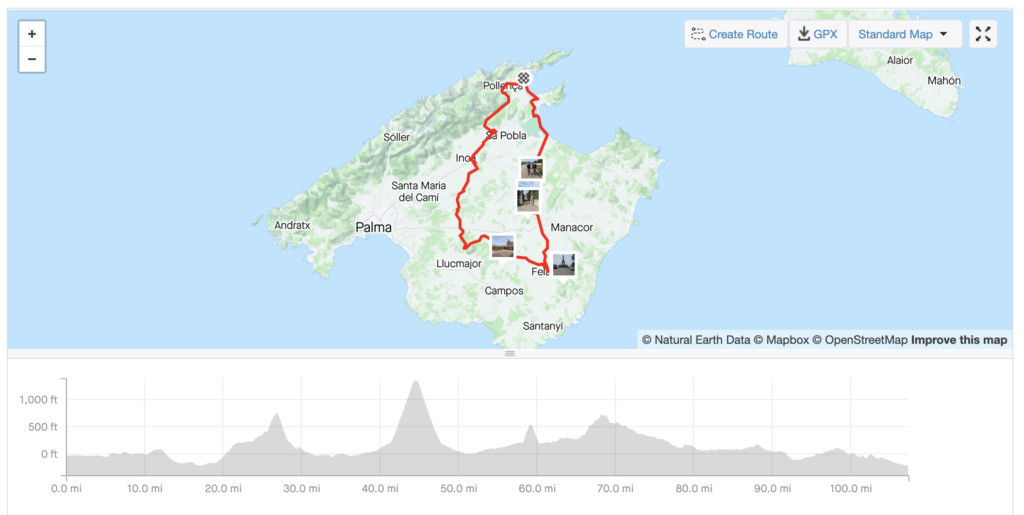
On Sunday, we’ll warm up with a shorter ride of approximately 50 miles along the scenic open roads of the east, and north of the island, enjoying the peaceful surroundings and occasional coastal views. We’ll end the day in the ancient and perfectly preserved walled town of Alcudia, where we’ll have dinner at the town’s finest restaurant.

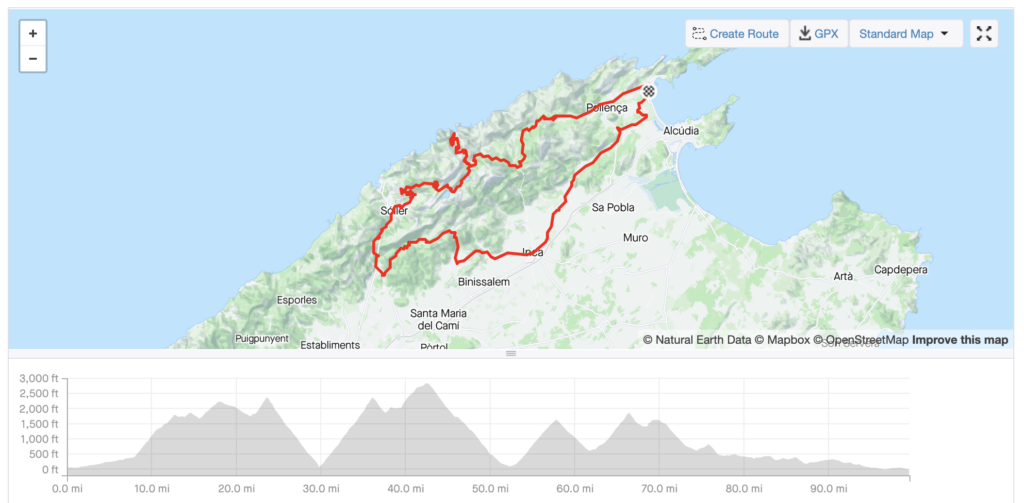
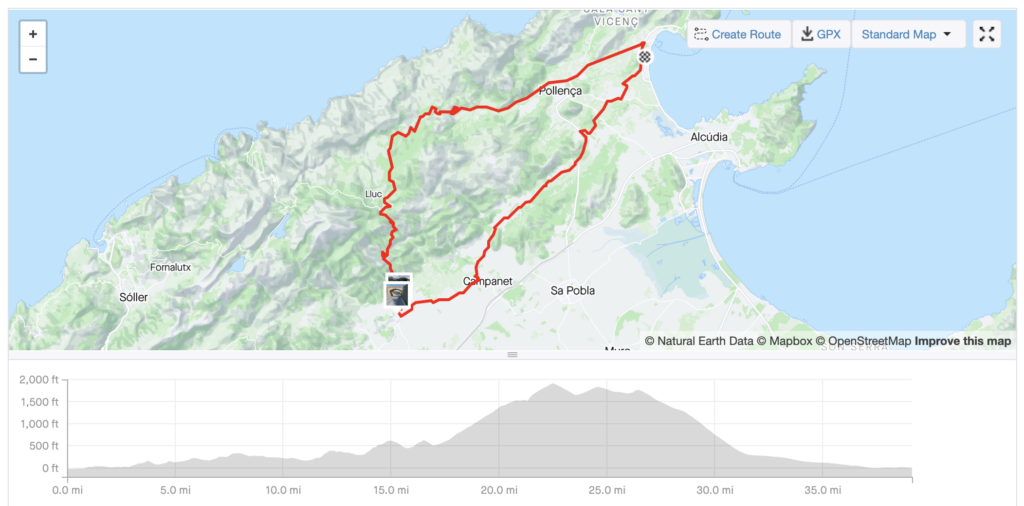
Monday is where the real riding begins, as we tackle some of the most thrilling cycling terrain in Europe. We’ll ride one of the following epic climbs — the Col de Femenia, the spectacular Sa Calobra, or the the Puig Major climb before a beautiful descent back to home. Please clean up before you hit the restaurants for those carbohydrates.

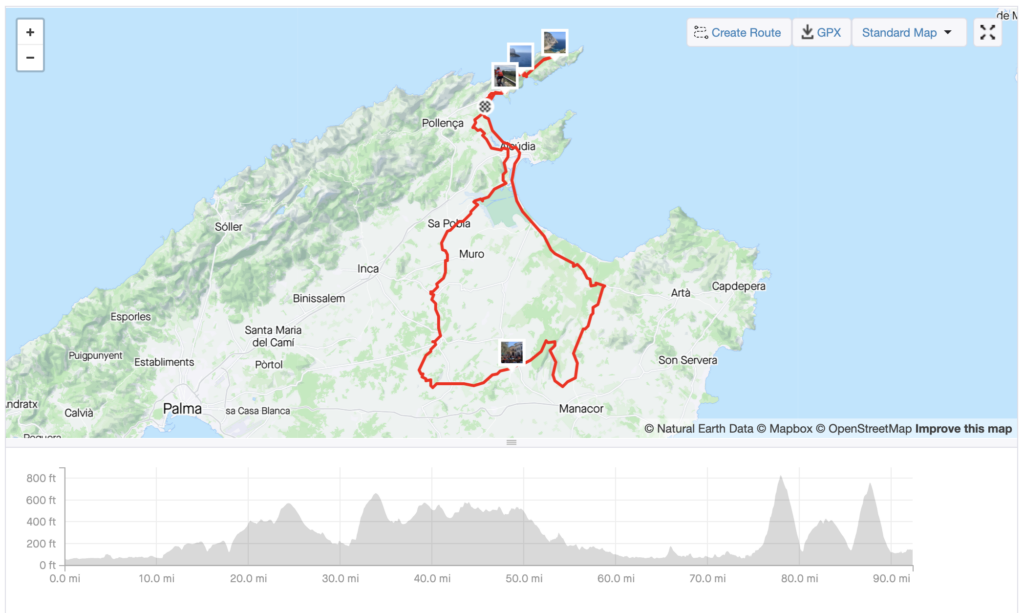
Tuesday is our big adventure day, which could be a point-to-point exploration of the gorgeous west coast of the island. This doesn’t mean an early transfer. We will be up and out the door to take the shuttle down south. Upon our arrival, we quickly get caffeinated and get on the bikes. There will be two groups to make sure everyone can complete the challenge for the day.

Wednesday is a much needed rest day off the bike. The ambitious might do a cross-training session, but most people opt to take it easy. We will do a Camp Dinner out (food is included!) so you can enjoy some delicious local food. Early to bed is key, as we have two days of riding left.

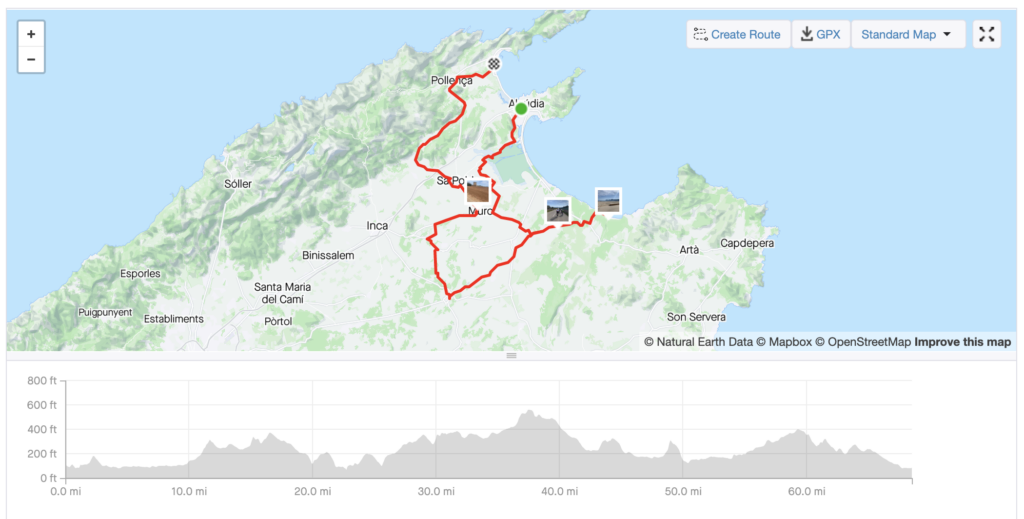
Thursday and Friday will be flexible based on the weather and your legs! We’ll have options to gain mileage or gain vertical. Each group can decide on the best course of action to close out the week.

Regardless of what you choose, know that you’ll be heading home with strong legs and a sense of accomplishment.

Um, and You Have to Think Twice About Mallorca Camp WHY?!

Is This Camp for You?

Our cycling camp is suitable for cyclists who are comfortable with long rides and regular training. You should be able to cycle at least 15 mph and are capbable of riding in a group. Most days will have 3 to 5 hours of cycling time, but the adventures might push you longer.

Don’t miss out on this exciting opportunity to tackle a thrilling cycling challenge and explore the beautiful island of Mallorca. Join us on for our annual Mallorca Cycling Camp and let us take care of all the details – all you have to do is show up and enjoy the ride!

Mallorca Miles Maketh Fitness

150 150 Patrick

On the way back from the cycling heaven that is Mallorca, and wanted to share out my explorations on the island – including some camp highlights. Also these notes are a good reminder for when I return in 2023 (oh yes, we will be back!). 

First up, the stats – 536 miles ridden and 29,950 ft climbed in 7 days. 💀 That’s an average of 76.5 miles and 4,200 feet every day. This involved a lot of independent riding – pre-camp, post-daily rides, and even on the rest day. Thankfully Mallorca makes riding easy to do!

While the climbs are my own, I relied heavily on my fellow campers on the flats. This included our incredible guides who keep us on the right path, well-fed and highly caffeinated (the last one is optional). And of course, good fortune that saved our campers from lost luggage, broken chains, and potential downhill disasters. 

Day 0 – A Great First Test

I landed midday and raced over to the hotel as quickly as possible. The first order of business was to unpack and get myself over to the Pinarello store. Super fast bike in hand, it was time to plan the route. We lost a little time getting my bicycle fit sorted out, but then it was off to the open road. There’s nothing like getting off a plane and being on a bicycle in less than 2 hours in Paradise! We planned to ride about 50 miles, but ended up focusing on the fun instead.

Day 1 – Orientation

The first official day of camp is all about getting organized. There is a lot of friction between people who travel with bikes, people who rent with bikes, and people who have never ridden together before. to make things easier, our guides sort the group by ability and for safety purposes — smaller groups are safer on the road.  the first day is a small test of all the things we will face this week. Traffic circles, other groups, rolling Terrain, and variable winds. it is the perfect opportunity for campers to practice riding in a group and learning how our guides will run the daily experience. A group lunch in Petra Was well X in terms of calories and the bringing all of the groups back together again.

Day 2 – Sa Collabra

With the first day of firmly in our rearview mirror, it was time to explore. With the weather looking honest in the coming days, we made the decision to head over to one of the most epic climbs on the planet. it is worth noting that even getting there requires climbing the Col du Feminia. Which is no small task. We refueled at a cafe station at the top before making the descent down the winding roads to the bottom. Even going down this climb is an adventure — there are more hairpin turn than you think is possible. It’s no surprise to learn this road was originally built by hand. I’m not sure how they would even get machinery there in the first place!

The Climb from the bottom to the top can take anywhere from 30 minutes to an hour depending on your goals and ability. This is a perfect early Camp test and a chance to stack yourself against tens of thousands of riders. It wasn’t my day, but I certainly enjoyed the chance to tackle these climbs in earnest.

At the top the group continued on to lunch and home. Matt and I made a right turn for adventure. There is a running joke on the island between me and a fellow Zwifter from England. He gave me coordinates for a gift that he had hidden at the top of a nearby climb, the Puig. With Matt in tow, or rather, with Matt towing me, we were off to find the prize. Coke collected, we continued to on the other side. We made an epic loop that took in 4 climbs add a total of 10,200 ft of climbing in just under six and a half hours of ride time. We made sure not to crack 100 miles just to drive everyone on the team crazy!

Day 3 – Recovery Ride

Regardless of the route people took on Monday, we were all tired by Tuesday. Given the chance of rain, this is the perfect day to spin over to the beach for photos and cake. Once again we gathered as a group for lunch to hang out and relax. After lunch the group split up on the way back with my group opting for some extra miles out towards Sineu. It is here that I ate the largest pastry of my life and managed to avoid the rain just like the other group.

Day 4 – Orient-eering

Another day of potential rain lay ahead, but it didn’t stop either group from making adventurous plans. My group decided to head over to the climb in the Sleepy town of Orient. hey picturesque Village nestled at the base of a Time where the road is covered in moss and is apparently deadly with any form of moisture on it! Good fortune kept the faith with several Mechanicals that forced us to slow down and keep Safety First. This resulted and I much longer day than planned oh, and we missed our fellow Riders after world’s greatest take place in Santa Maria. thankfully they had given us some leftovers which we devoured. as you’ll see in the map, we decided to take a more direct path home due to time constraints.

Day 5 – Off Day

After four straight days of 5 to 6 hours a day on the bike, it was time for rest. It was also time for some serious rain, which is always the right car on the island. The Limestone roads are not safe when they get wet despite what you see other Riders doing well you are staying dry.

Of course, I was there to ride and convinced Matt to go out for a quick 40-mile loop. Truth be told, we were rolling the dice from the start with the rain coming in over the mountains. We split the difference, cruising the flats to warm up and then hitting the Sa Batalla climb for a coffee break before heading home. We had to take shelter from the rain at the top, and this was where I realized I didn’t have gear for wet weather (it was all in my hotel room!). I did however have a plastic bag, also known as a packet in Europe, that I put under the front of my jersey. While it certainly didn’t make up for the vest and arm warmers that everyone else was wearing, it was a lifesaver. descending in the rain flights pretty terrifying and I think my shoulders are still tight from how hard I was gripping the bars.

Day 6 – Three Out of Four Ain’t Bad

Our final ride day of the camp saw both groups opting for a more epic day. We set off early and plans to rent accordingly so that everyone can get maximum distance on the bike. One group was able to hit the local velodrome for some fun laps in addition to logging 85 miles. My group went a little wider around the island to find a few new monasteries to climb. Both groups found some solid headwinds for the first half of the day oh, the remnants of the storm from the day before. While we all suffered mightily to start, the winds hung around long enough to help push us all home.

It’s never easy to say goodbye to cycling paradise, but after a day like Friday I was happy to say goodbye to my two-wheeled dream machine.

Planning for 2023

We will be back in April 2023 for another year of adventure. You can learn more and make your deposit online here. You won’t regret it!

Alpine Loop Gran Fondo Interview with Jeremiah Bishop

150 150 Patrick

Coach Patrick from Endurance Nation sits down with Alpine Grand Loop Fondo founder and chief hooligan Jeremiah Bishop to talk about the event.2021 will be a unique year for all of us given the current state of the pandemic, but thankfully we have a handful of fun, human, and challenging events like the Alpine Loop.

Friendly remind her that we will be up at the grand Fondo for the weekend, chilling out and even doing a Friday recon ride on the course. You can learn more on our official event page here.

Participants can choose from a variety of different distance options, all the way up to a 110-mile challenge. Full event details and registration on BikeReg.com.

The video will be posted online here: https://youtu.be/6sW3FJx_KOc

Race Saver Bag: 1, Ohio 70.3: 0

150 150 Patrick

One of our favorite things to do is read feedback from our amazing and super good looking customers. Here’s a dispatch from Ohio 70.3, from a first-time Race Saver Bag user! Keep crushing out there! 💪

As I am sure you have heard previously, this saved my race.  

STUPID hot run at Ohio 70.3 – filled the bag with ice at every water station and kept moving.  AMAZING!  

Too bad they didn’t grab a pic of me wringing it out over my head.  Magical! 

Will definitely be bringing it to Chatty for the 144.6.”

~ Sarah Bristol

9.2% Grade for Four Miles? Let’s Gravel!

1024 768 Emily Brinkley

After long hours in the saddle on our first day of gravel camp searching for the backside of Beech Mountain, it was time to take the guys to my favorite area to train off-road. A 20 min descent down gravel roads located directly off of the Blue Ridge Parkway will dump you into wild and wonderful Wilson’s Creek. Knowns for its 23-mile mountain creek which begins at the top of Grandfather Mountain, this rugged area of the Pisgah National Forest is a favorite to hikers, campers, kayaks, all-terrain vehicles, mountain biking, and gravel grinds. 

STRAVA FILE FOUND HERE

We decided to access Wilson’s Creek from Pineola, NC which quickly became our group’s favorite decent of the weekend. The gravel was smooth the entire way down with a few ruts in switchbacks. I was on my hardtail so the front suspension offered plenty of support and confidence for an epic descent down the 9 miles, 2500 elevation loss… What I gained in descending speed, I would lose in the climb back up at the end of the day. 

We reached the town of Edgemont which would also become a favorite for the weekend. When Matt first mentioned we would be climbing Globe Road up to Blowing Rock, he said my face sunk like I had just seen a ghost. I’ve climbed Globe twice before, once on my full suspension mountain bike and once in the back of a pickup truck after showing up with the wrong gravel gears. This beast is legit. It’s a 4-mile, 2,000 ft gain, averaging  9.2% kinda climb. It’s one of those climbs where you turn to see another steep turn, and another, and another. While the hour climbing wasn’t pretty, I made it to the top just in time for lunch in Blowing Rock, NC. 

Maybe we spent a little too long at lunch, or maybe I ate a little too much, or maybe I’m just making excuses. Whatever it was, I found myself in my own personal hurt locker on the way back to Pineola. We descended back down Globe and slowly made our way back to Edgemont. Another steep climb back up to Gragg (pronounced Graaaaaaaag), I looked at the guys and said, “I know my house is five miles that way and I’m having a very hard time NOT taking a right turn.” Coach P said, “you probably don’t want to eat right now, but this is me encouraging you to eat right now, EB.” 

(This seems to be a theme with me and big training rides.)

I was 110% bonking and decided to eat all of my food. It was like a sugar-buffet-party-in-my-mouth. Matt told me I was not taking a right towards home and that I was going with them. I’m so glad I listened. We descended back down into Edgemont where we stopped at the Historic Coffey’s General Store to grab a coke, protein bar, and some pretty cool pictures. By then I had come back to and was ready for the final 8-mile-climb back up Pineola. 

While I get to ride this area all the time, I rarely get to do long rides like this and never have riding partners who will join in for the back-to-back volume. The stories that come with the miles and overall camaraderie with the groups are my very favorite part of training camps with Mile18Inc. The fitness gains don’t suck either. 

We finished out day two back at home base where the guys showed off their sweet grilling skills, Josh definitely won MVP with his fire skills, and I ate all the s’mores. ~ EB

Seven Critical Steps to Prepare for Your Epic Century Ride

150 150 Patrick

Getting ready for a century ride or epic cycling event is actually a lot of work. You’ve been following a cycling training plan for weeks now, but the logistics matter too! The closer you get to your century, the more clear it becomes that even one small misstep can really ruin your experience at the entire event. 

Here is our list of 7 key ways to guarantee the best possible ride experience at your next event. 

#1 Reservations & Rentals Check (14 Days Prior)

If your event involves traveling to a different location, this significantly amplifies the early portion of your logistics.

If you have a flight, or a hotel, or even a rental car, then you’ve got some serious planning to do. And if you have all three? Well, you had better be ready.

Make sure that you have the proper reservation information saved readily on your phone. Not just in your inbox, but actually copying and pasting the confirmation number into calendar events for the day and time that you’ll be there.

For example, take that rental car confirmation number and create an event on your calendar to trigger at the time that you are disembarking the plane. This way, future you will have the information s/he will need without extra work. 

If you are flying, then make sure you sign up for text notifications on the flight status. Add airport travel time reminders to your calendar so that you won’t be late. All that extra time to deal with your bike and checking that in safely with the airline. Have your frequent-flyer number and credit card ready to deal with all relevant Logistics and additional expenses.

Bonus Item:  Find and save the phone number and information for a local bicycle shop in case you need it.

#2 Key Contact Information Check (12 Days Prior)

 Traveling to this event means being a part of something bigger than just a regular ride. Make sure that you have saved the relevant information to your contacts so that you can easily access that information in the future even without an internet connection.

Cut the event side, you’ll want to know not only the agenda for what’s going to happen but also who the point of contact is. Be sure to save the phone number as well as an email address.

If your event involves an airport pick-up or rental car, make sure you have that separate information dialed in as well and that you’ve sent your itinerary over according to the information you captured in step one above.

Many events use a digital communication app or product for the weekend. Be sure to have that installed in your phone with your relevant information in it as well. If you haven’t done so already, make sure that it works! Send a message, read a message, like and reply to a message —  just to know that everything is operating properly. This is not something you want to be doing on the morning of your event.

Of course, you should have your emergency contact information also readily available. Especially if it’s not someone who you would normally identify. having all of this line up ahead of time is critical for safety and peace of mind.

#3 Check the Weather ( 10 Days Prior)

 you probably don’t need a reminder to do this, as it’s likely you’ve been checking it for weeks! Most extended forecasts are made approximately 10 days in advance, but the accuracy of those forecasts very wildly. 

Use the information from the forecast to plan accordingly. Working macro from micro, start first by identifying key factors like sunrise and sunset. Capture the lows and highs of those days as well, which will set some baseline expectations about pre, during, and post-ride clothing needs.

Finally, look at the weather for the time of your event. You should continue to update this once a day as the event nears. At at least right now you have a 50% chance of knowing what the day is going to look like. 

 this information is critical to make sure that you have all of the requisite equipment end gear needed to be safe and successful. Some of these items take time to cure, so having the information earlier gives you extra time to solve any problems.

Balancing the forecast against the macro numbers you have, you can begin to narrow down your clothing choices appropriately  (see #4 below). 

#4 pack your gear

 now that you know what the weather will be, and you have a good sense of the right parameters, you can begin sorting out your gear.

Before you start putting anything into a bag or suitcase, use this visual packing method first.

Take everything you think you might need and put it in a pile on your floor. Picking it up from the ground, use your bed as a display case for the clothing that you will be bringing. 

Riding for two days? Two jerseys go in the upper left-hand corner, and to bib shorts go in the top middle. Two pairs of socks go on the right! 

Anticipate cooler mornings? A vest and arm warmers go in the left-hand corner. 

Always feel safer with gloves on? Put those in the bottom center. 

Concerned about inclement weather? Bring a rain vest for a jacket in the bottom right. 

Laying things out visually allows you to make sure you have everything you need. You can easily reference your list and the items displayed on the bed in front of you. If needed, you can add and subtract items until you feel just right. Only then should you begin packing things into your bag. This is the best way to make sure that you have everything you need and you haven’t left anything behind.

Side Note: Always bring an extra set of kit and additional warm weather clothing. Once you stopped writing, even on warmer days, your body can get quite cold. You’ll want the gear just in case. Of course, if you’re going to be going to a warmer climate, be sure to pack the sunscreen as well.

#5 Your Final Workouts

Let’s not forget that you actually need to be ready to ride when you hit the ground! We don’t want to shut down your training too soon, as you’ll start experiencing the effects of losing your fitness. Depending on the level of your peak fitness and the demands of your event this may or may not be an issue. Regardless, you have a habit of training and disrupting that can simply affect you mentally if not physically.

This is why we recommend having a scripted set of training sessions for the final seven days. You will need to block out the days where you’re traveling, but setting this plan in place ahead of time ensures that you will comply with what’s written.

In general, oer the last seven days you want to stay active in a general sense. Every session you can do on your bike, the better. If not your bike, then perhaps an indoor bike or to extradite you have at home (so smart to have more than one bike!). 

 if you can’t fight, stay active with the short run or similar aerobic activity. If anything, this can help you stay sane. The only real caveat here is that we don’t want to do anything that’s risky. A new event is right around the corner and there’s plenty to be done. If you couldn’t train whatsoever in the few days leading up to the event, you would still be okay. Unhappy, but okay. 

In terms of intensity, most of the sessions should be aerobic in zone 1 or zone 2. If your event involves play intensity efforts, then two of your sessions should include short bursts of intensity at race pace effort with plenty of rest. An example for example, twice through four minutes at threshold effort with six minutes of recovery.

#6 Pack the Bike

With your last few sessions done, you can go ahead and pack your bike. You can make this process a lot easier by blocking out the time in your calendar to get this done. Perhaps you can use that day’s workout window to get this done.

Before you pack your bike, give it a once-over. Clean it up and make sure that everything on the bike is in good condition. If there’s a problem, you want to be able to solve it now instead of in a new town or city. 

Open up the case to have all of your tools ready. Have a decent-sized ziploc bag to hold any parts you remove, and another one for the tools. Each tool that you use to disassemble your bike, when finished, should go into the ziploc bag that you’re taking with you to the event. This way you know that you will have all of the tools you need at your disposal for everything that is on your bike.

Take your time to do this right, ensuring that your bike is safely secured. Regardless of the type of case that you have, improperly packing your bicycle adds significant risk to the travel equation. 

Avoid packing extraneous heavy or sharp items inside with your bicycle. An empty bottle or two, for example, is fine. Adding your nutrition powder and energy bars end a bicycle pump is not encouraged. This adds to the weight of your bag and can jeopardize the stability of the bike itself. Do your best to keep those extra items in your checked bag.

Side note: We recommend traveling with your helmet, shoes, and pedals in your carry-on bag. In the event that your bike doesn’t make it, at the very least you have the minimum required to hop on a new bike if you’re able to secure one on site. 

In addition to your bike, be sure to also pack the extraneous items that orange clothing but are related to cycling. This goes for your computer and requisite charging cables. Safety lights, sunglasses, spare tires, etc. Perhaps even the cleaning rag. Note that you cannot travel with co2 cartridges on an airplane, so have a plan in place to secure those when you arrive. 

#7 Test the Bike

Once you’ve arrived and made it safely to your lodging, it’s time to put the bike back together again.  Even if you pick your ride up on-site, it’s time to give it a once-over.

You have time now before the event to fix any problems you can find. If you wait till the morning of the event, you run the risk of having to ride with that problem or not being able to ride it all.

Do your best to put the bike together safely and get outside to give it a short ride. Go through all the gears, make sure the brakes work, and that everything feels fine. Check the tire pressure and attach all the safety lights. 

Your goal here is to go to bed the night before the ride with everything in place, 100% ready to go.  Guaranteed you’ll sleep better. 

Happy Riding!

Five Reasons You Need to Elevate Your Cycling

150 150 Patrick

Epic Cycling

Climbing is a critical part of your cycling arsenal and you overall development as a two-wheeled athlete. It’s not just about adventure; if you want to be strong and competitive, you need to ride outside and find hills. Riding hills can make you a better, stronger, and faster cyclist. 

So when people think about riding hills, most of us are struck with fear right in the heart. “Oh my god, hills, I hate them!”

No one is immune. There was a period of time in my cycling career where, after a tough race, I literally would go around hills. I added extra miles just to avoid the hills that I would discover on my route. Why? Because I had been beaten down by a bad hill experience. 

It wasn’t until I learned to embrace the hills that I started to become better as a cyclist. Here are five reasons why you need to head to those hills and start getting stronger.

The First Reason is Cadence. 

So climbing the hills actually really forces you to become one with your cadence for a variety of reasons. 

First and foremost, we have to start using all the gears on our bike. Most cyclists only really use one or two gears. The rest of the cogs in their rear cassette are super shiny. Or maybe the trainer is the default setting and the full range of the cassette isn’t needed. A consequence of this scenario is our rider is not using the full range of their body’s strength.

Riding at different cadences, whether it’s in the small ring or the big ring, forces you to recruit different muscles. It also changes the way that you think about powering your bike. 

You can change the level of torque that we’re putting into the pedals: the higher the cadence, the lower the torque, the lower power per rpm.

And so as you start climbing hills, sustained climbs, you have to get into a rhythm with your cadence. Climbing hills forces you to do that. It feels uncomfortable at first because it’s just not something that you normally do. The sooner you get better at handling different cadences and managing your choice of cadence (knowing which type of gear you want for this particular section of the hill), the better you’re going to ride. 

You are going to stop losing those precious seconds from shifting errors. As a climber, you must retain that precious momentum, otherwise you will really slow you down between gear changes or transitions of the terrain.

The Second Reason: Your Position

So when you’re climbing the bike and you are going up either a steep or a sustained climb. Typically athletes will shift to the back of their saddle. Their hands will go on top of the bars — on the hoods — not down in the drops.

You should sit tall and focus on getting air in through your diaphragm. And in that position of being pushed back, we also get to change how we torque on the pedal. Sometimes being able to push a little more forward and down (rather than just down) can be a helpful change. 

Additionally, you focus on pulling up on the pedals as well as pushing down. This will help you master the art of turning better circles at lower RPMs. This can become a comfortable space, and climbing hills will help you improve this skill. 

Adapting your position to the terrain helps you to stay comfortable. It also enables you to continue to apply pressure to those pedals. So getting comfortable in that climbing position will actually make your stronger cyclist. It gives you a new position that you can take on when you’re on the flats or another terrain.

The Third Reason: Relaxation Under Stress

When you’re grinding up a hill there comes a time when you are out of gears, you’re clicking, and it’s not going. It’s like not happening. 

The answer is clear: you are going to have to work. 

This is when cyclists get tense. For example the hands really start to grip the bars. You can see it up on the shoulders which are super high. They’re using every fiber of their muscle to help their quads and their glutes push that bike. This doesnt’ help your legs, and actually is the source of a lot of wasted energy.

Take a look at professional cyclists. They make climbing and suffering look easy. This is because their body is relaxed. In a way, this relaxation lets them do even more work.

You need to find a space inside the “work” of climbing that is still relaxed for you. This way, when you feel that tension and the pull of gravity on you can still find places to relax. 

Which part can you relax? Can you drop those shoulders? Can you change your breathing? Can you stretch out your back a little bit? Can we shift in the saddle? How are you going to find space inside that strength to be comfortable?

We’re transitioning from that flat, I’m going fast, I’m getting this big return on my work mode…over to this climbing section where the capacity for returns has shrunk dramatically. It’s almost a claustrophobic feeling. Finding a way to get comfortable inside this tighter space is really important. 

It’s an important part of your cycling progression to become better at handling extreme amounts of stress and other places when you’ll ride, which are like sprint finishes or other climbs or places during the bike ride where excessive power is actually to your advantage.

Learning how to climb in that situation is an opportunity to do that a little bit in slow motion. So you get better at recognizing the the enemy that is pain, and you can wrestle with it a bit and come to terms with it right on your own, which I think is really important. 

The Fourth Reason: Developing a Standing Rhythm

One of my biggest pet peeves is riding with triathletes (yes, I am one!) who decides to stand up. Because the minute they stand up, their bike comes backwards right into your front wheel, unless you’re super careful. And that’s because triathletes don’t have a good sense of what it means to keep tension on the pedals.

Even when they’re transitioning from seating to standing as a result, that bike starts to jerk back. And you can tell the difference between someone who can climb smoothly or someone who’s climbing quickly. And someone who’s climbing with rhythm, right? If you think about it from the dance floor, you know what rhythm is on the dance floor, calming your bike is also very similar.

If you’ve watched some of those pro cyclists ride, men and women are like, and when they climb that bike is just rocking underneath them and they’re just moving up that hill, it’s one fluid motion, and they’re going versus what I believe most of us look like. We’re just grabbing those bars as tight as you can.

And just jerking from side to side. And just praying that every ounce of energy we have is going into the pedal into the drive chain, into the wheels, into the road and getting us over the top of this really grueling hill. So climbing actually forces you to develop a rhythm outside of the saddle, which I think is really important.

We all have a cadence that we’re familiar with when sitting. But are you familiar with your standing cadence and know how that can become an asset for you? Just even down the road, again, launching into a sprint, picking up some momentum over the top of a hill, or just giving your back a break for a little bit and standing for 10, 20 minutes, the more comfortable you get a standing, the better off you can be.

Power-User Tip: When standing, you want to get your shoulders over the tops of the handlebars bars. If you’re standing, you should be able to look straight down on top of your hands. You can do a lot of work there with the core muscles that are going to fatigue super early. Stand tall on that bike and develop a new standing for them. 

The Fifth Reason: Descending

One of the reasons that people don’t like to climb is because they have to go down the other side. Becoming comfortable with descending, especially if you’re a fortunate enough to be in a group ride, is a super power user skill. If you can handle your bike going fast on a descent, then you can handle your bike on the flats at half the speed.

Descending and bike handling are critical skills whether you ride off-road, road racing, or just riding for fun. Even triathletes can benefit from better bike handling skills. Descending is a great place to learn because we don’t have to worry about braking or shifting. 

Descending is all about weight, distribution management, picking your line, things that we need to be doing when we’re on the flats, when we’re transitioning from a slight downhill to a flat or from a flat to a slight uphill picking our line, how do we want to handle it?

For most people learning how to descend downhill starts by riding downhill with someone else, following their line, and learning their body language.

So definitely pick someone who you think is a good descender or ask around and find someone who isn’t. Do your best to stick safely behind them at a safe distance. You can manage it and pick up some new descending skills. 

Moving Forward

So when you’re thinking about your training and you hesitate at a hill, don’t turn around. Go straight up that hill. 

You’re going to do what your can with the gears on your bike. You’re going to work on your cadence. You’re going to work on your positioning. You’re going to find comfort inside the stress. 

Find that rhythm that works for you on the hill. And then finally enjoy the reward of the descent. Focus on those bike handling skills. Catch your breath as you zip up that jersey again. It’s time to get back to work and be ready for that next hill. Ride on!

The Virtual Phoenix Challenge is Live

150 150 Patrick

It only took a few minutes after we pushed go on the event website that the messages started coming in.

“No way I can make it in person, how can I participate?” “Will there be a Zwift version?”

After a few weeks of deliberation, we’re pleased to announce that yes, there will be a Virtual Phoenix Challenge Double Century ride!

No Excuses

Can’t make it? Not vaccinated? Afraid to ride outside in national parks?

You can throw those concerns away thanks to the new virtual phoenix option on Zwift. You don’t even have to take the bike off of trainer. You can login and start riding your century on the weekend of June 11th to 13th. Two centuries (100 miles) on back to back days will count!

Image from the OC Register

Step One: Are You Tough Enough?

Doing a century ride indoors isn’t for the faint of heart. Or the thin of bib short.

Now do another one on the very next day? You clearly have issues.

This can only mean one thing — you are part of our tribe.

https://www.bikereg.com/the-phoenix-challenge-skyline-double-century-ride

Step Two: Register Online

Visit the event on BikeReg here. From there you can select the virtual option and register. The cost is $50 for the event and includes some of our ride swag in addition to recognition in the Phoenix Hall of Fame.

We Ride We Rise on Strava

Step Three: Join our Strava Group

We are using a Strava group to track your participation. This goes for riders joining us in the real world as well as those participating virtually. By becoming part of our Strava group we will be able to see your data for the workouts. As a reminder, Strava does have a free option so you’re not required to pay anything to be a part of this process. Join the group here.

Step Four: Plan and Execute your Indoor Rides

volume distances indoors is no joke. And someways, it’s mentally tougher than being outside. You still need to fuel properly and take care of your body. As you prepare for your virtual Phoenix Double Century adventure, be sure to take your nutritional and physical needs into account.

Here are suitable courses on Zwift:

Hope you can join us!!

Adventures Are Better Than Ordinary Century Rides. Hands Down.

150 150 Patrick

Coming off the last year that was 2020, it’s time to enter return to cycling with a bang. Seriously.

After much planning, we have put together an epic two-day adventure that combines the challenging roads with beautiful scenery — the Phoenix Double Century Challenge (www.weridewerise.com).

Ride like a professional cyclist with your daily logistics 100% sorted. From organized stops to professional SAG to luggage service meeting you at the halfway point, your only job is to ride the bike and enjoy the incredible trip on Skyline Drive.

Mary’s Rock Tunnel, Skyline Drive

Two days and 200+ miles. One way has more than 10,000 feet of climbing — it’s tough, but it’s achievable. We will be riding on Skyline Drive, a National Park. The roads are well-maintained and quiet.

No grade is steeper than 6% and all of the turns a gradual and fun to cruise. There are three convenience stores along the route or you can shop as needed in addition to our professional support vehicle. We even have training advice for you. Or nutrition advice should you need that.

Take advantage of the overnight pitstop to recharge your batteries and test yourself on the return trip home.

We Recharge at Basic City Beer Co (Yes, they have food too!)

Join Team Endurance Nation and other adventurous cyclists for this great adventure.

We have organized a low-contact 99% outdoor adventure for those of you ready to get back to the open roads in 2021.

Full details are online here: www.weridewerise.com Registration is on Bike Reg.

Long Bike Rides – How to Build a Peak Cycling Mileage Week

954 632 Patrick

Whenever you are training for a big ride day — whether that’s a grand fondo, something like the Phoenix Double Century Challenge, or just your own adventure – there’s a block dedicated to peak miles. It’s part of your Long Ride Preparation.

This is the week, two weeks, or perhaps even three weeks (depending on your fitness and the ambitions you have for the big day) where you really add additional training time. These are your biggest mile weeks. 

Sometimes it’s just a weekend or a few days. Or maybe you are going big and making the whole week a volume focus. Whatever it is, hitting peak miles in your training is both an opportunity and a challenge.

The Mental Side

From a mental perspective, those peak weeks are designed to test your resolve. Being successful at these longer events requires you to knowingly enter a space where things are going to be tough. Where you understand that you’re going to be challenged. And not just your life choices, but also: route choices, pacing choices, friend choices, course choices, etc. 

Is this really a good decision?

Part of the reason we do these peak weeks / peak miles is to recalibrate you mentally for the challenge of the big day. As an Ironman triathlete, I know I have to ride 112 miles on race day.

So my peak weeks would have me doing double that mileage in terms of total training volume. And I would also go out and do a 130-mile ride or 150-mile ride once a season. This is part of that mental reset. If I can do 150 miles and be on my bike for eight hours, I can easily ride 112 miles.

The Self Assessment

After eight hours, five hours sounds positively reasonable! That’s a key part of these peak weeks. As you proceed through this peak block, do a quick self-assessment to see where you’re at and then keep a blog or keep a log and know, Hey, how am I struggling?

These notes are the counterpart to your ride data. Log them where you can refer to them. If you’re preparing for another long ride, it’s really helpful to be able to go back and look at your notes from the last one. What worked? What didn’t? You can now implement those changes.

The Physiological Challenge

On the flip side of that, we have that physiological challenge. While mental challenges can have you up and down, physiological challenges can derail the whole peak week and really sets you back if you aren’t careful. 

Think about handling the peak miles from a physiological perspective in three critical ways. 

Number One: Make it Achievable

We want it to be a stretch goal, but not like a stretch goal with a gap that we have to jump over. On our bike and pray that we make the other side. And if we don’t, we may be broken. That’s a bridge too far and not one that we want to cross so early in the season. 

If your average weekly mileage has been 150 miles, that stretch goal might be 250 miles. It’s just another a hundred miles. That’s one long day. It’s two medium-long days.

If you can modify your week, then you can add riding on top of the regular rides that you have. This could be just as easy as saying I’m going to ride in the morning, my normal ride. And then in the evening, I’m going to do a bonus 20 miles on the trainer or around the neighborhood to add that extra a hundred miles between Monday through Friday.

And in other cases it may be, I’m going to go out to some specific location and do a, a century ride or something similar on terrain that’s applicable to my event or whatever it may be, whatever it is, understanding that, that. Delta between where you are now and where do you want to be?

It has to be a step change, but a step that you can reach. So it’s challenging enough, but not over challenging.

Number Two: Pace Properly

We have to maximize the pacing long ride pacing, especially early season. Pacing should be biased towards a negative split. 

When I look at the ride files of athletes and the early season rides, they almost always want to hit the ride hard.

Peak 20 minutes or peak 30 minutes for heart rate? It’s almost always is located to the front the data file because we’re full of energy. We’re full of ambition. That first hill? We hit it. This is not the recipe for success in a peak week.

Rather we want all of these miles to be steady. And then the last portion, the last 20% last 25% — if you’re feeling good — can show a little bit of flash, a little bit of effort. That’s where we start to separate out from the baseline training and all the riding. And the beginning of the first 80% was just to set you up for that last 20% where we make the fitness.

That’s where the fitness happens. It happens at the end. So bias yourself through pacing towards a strong finish in these peak week miles, whether it’s individual rides or just all the rides across the block of the week. Super important. And then finally, The third part of this handling peak weeks is around recovery.

Number Three: Recovery Mode

When you’re in long ride peak week mode, recovery becomes critical. Not just recovery on a macro perspective, but on a post-ride perspective. We have to get it right, because during peak weeks, there’s not a lot of time between these critical sessions. 

If you’re doing four hours today and four hours tomorrow, and you started at 8:00 AM and you’re done at noon, you can start at 8:00 AM tomorrow. You’ve only got 20 hours left. And you’re going to sleep like seven or eight of those hours.

So you’ve only got 12 hours left to do stuff to get you ready for that next day. So the recovery piece is part nutritional. It’s part hydration, making sure you’re refueled afterwards. It’s self-care in terms of stretching or recovery boots or compression tights or whatever you use. It’s also part scheduling, making sure that the rest of your day is not full of work that’s going to exhaust you doing a long ride. So skip that four-hour yard work project!

Remember, don’t go too big with the peak weeks. Be smart. If you do it just right, you will peak at the right part of your training and be ready for the big day. 

Good luck and ride on.

  • 1
  • 2